
How to change brake fluid
Modified On Oct 29, 2018 By Rommel Albuquerque
- 5630 Views
Motorcycle brake fluid absorbs moisture over time and it needs to be changed periodically. Just like you would change your engine oil, in order to ensure that it retains its properties and to prevent mechanical parts from wearing out, the same holds true for brake oil too.
Be very careful when changing or topping up the brake fluid as it’s very corrosive. Cover or protect any parts which may come into contact with it.
The manufacturer's service manual will tell you how often you should check the brake fluid level and when it should be replaced. But generally, the brake fluid level should be checked every month or so, and topped up if needed and it should be completely changed every two years.
Before you start:
There are different types of brake fluid used in motorcycles. So how do you know which one your motorcycle requires? The service manual will tell you what type of brake fluid you should use and it will also be engraved on the brake oil canister. Normally a regular motorcycle will require DOT3 or DOT 4 grade brake fluid.
![]()
Steps to follow to change brake fluid:
Switch the motorcycle off and let it cool off for 15 to 30 minutes so that the oil returns to the bottom of the sump.
Put your motorcycle on its centre stand so that it is on a stable and horizontal flat surface. Tilt the handlebars so that the brake fluid container is as horizontal as possible to the ground. Keep a container ready to transfer the used brake fluid and keep the new brake fluid ready.
![]()
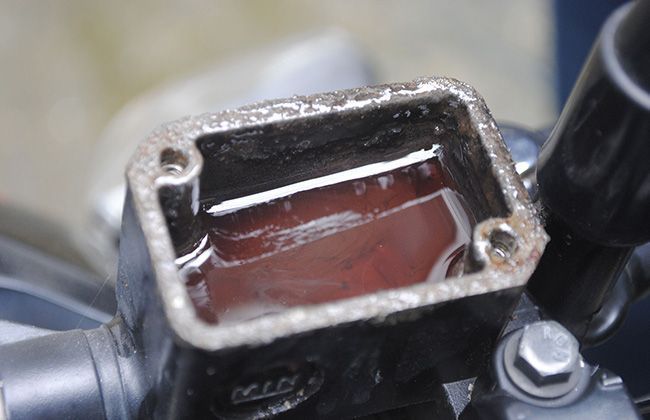
Unscrew the screws in order to open the brake fluid container cap. This is also referred to as the master cylinder reservoir.
![]()
At the bottom where the brake pads are, you’ll see a cylinder receiver. The top of the receiver has a drain covered with a cap in order to evacuate air bubbles.
![]()
Remove the drain’s cap and install a pipe attached to a syringe on the drain's screw. Now start removing some of the used braking liquid from the master cylinder's reservoir, but make sure that you leave a little so that air does not get into the circuit.
![]()
Next use a syringe to inject a little new liquid into the reservoir. Squeeze and then release the brake lever 3 consecutive times, then pull in the brake lever once again and hold it there. Slightly unscrew the drain's screw.
![]()
Slowly release the brake and watch the fluid leave the pipe. Then tighten the drain screw before releasing the lever.
![]()
Repeat this action until new fluid appears in the pipe, without any air bubbles. Each time you carry out the operation, remember to put new fluid into the reservoir to ensure that air does not get into it.
![]()
Once the process is complete, tighten the drain screw and put new fluid into the master cylinder reservoir. Make sure not to fill too much and don’t exceed the maximum marker line. Then screw the lid back on and you’re done.